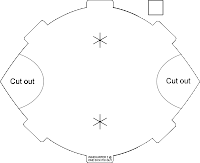
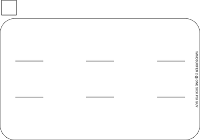
Saw this posted a while back on DL.TV in which a paper template called Windsurfer (or Ez-12) was used to create your very own super cheap WiFi booster but I never got to trying it out until now (because I wasn't using any WLAN hardware back then ... duh!). Basically, when the pattern is cut and assembled it forms a parabolic 'dish' of sorts that focuses or boosts the signal towards a particular direction instead of letting the signal roam freely. The original site boasts an increase of 9dBi to 12 dBi and many people have also written in claiming that it managed to boost a signal to parts unreachable before.
Intrigued, I downloaded the template and did my own tests (and adaptations described later in this post).
My hardware consists of a D-Link DIR-615 wireless router running solely 802.11N mode with WPA2-PSK as the access point. The receiving end makes use of the D-Link Rangebooster DWA-140 USB wireless adapter also running in 802.11N. The signal has to travel through two solid brick walls before reaching its destination and often contends with two other APs located nearby. Here are the results using the installed software.

Signal strength at 7% when NO antennas attached.
 Signal strength at 51% with single antenna attached.
 Signal strength at 63% with dual antennas attached.
 Signal strength at 85% with single antenna attached and Windsurfer.
 Signal strength at 39% with single antenna attached and Windsurfer facing opposite direction
(to prove that the Windsurfer does actually affect the signal)
 Signal strength at 51% with single antenna attached.
 Signal strength at 63% with dual antennas attached.
 Signal strength at 85% with single antenna attached and Windsurfer.
 Signal strength at 39% with single antenna attached and Windsurfer facing opposite direction
(to prove that the Windsurfer does actually affect the signal)
Based on my rather crude tests, I have to say that I'm impressed with how well the Windsurfer works. What's amazing is how a single antenna and the Windsurfer manages to beat a dual antenna setup.
Problems?
First off, the original JPG template was serviceable but rather crude and was a bit too large for the antennas of my router and the shelf space I had them in. Scaling the file resulted in the lines getting blurry. Secondly, the template itself was a little wonky for my liking 'cause the tabs didn't really match up with the slot positions. The resulting Windsurfer was ever-so-slightly skewed because of this. Additionally, the slots were too big for the tabs thus making tape or glue necessary to hold the parts together securely.
So I did a little tweaking and came up with my refined version of the original Windsurfer which I guess I dub Windsurfer 2. All instructions remain the same as the original Windsurfer and each template prints out for two (2) Windsurfers onto either Letter or A4 sizes. You can download the templates in PDF format below which will print out in colour or black-and-white. Coincidently, all test results shown above were made using these templates.

If the templates are the wrong size, you can download the following high-resolution .PNG files and scale them however large or small you like in any graphic program (or even Word or OpenOffice). Just make sure that the two squares next to the parts remain square and are the same size between them so that they can fit together later. My own rule of thumb, make the dish side height the same as your antennas to ensure that the entire signal is reflected back. You can even customize and add your own fills, logos, text, slogan, clipart onto the templates to suit your taste.
 |  |
..... Show/hide full post

been looking for a scalable version, thanks so much!
ReplyDeleteCould you update your links to the templates. Just what I was looking for, would love to DL the Letter one.
ReplyDeleteThe links have been updated. When you get to the Google Docs viewer for the relevant file, you can either enlarge the png image, and then save that image to your pc. Or you can click Ctrl+S and save the pdf file to your pc.
ReplyDeleteThank you, one-sick-psi-guy, for this helpful and informative post.
Has anyone come up with a fix for a wifi router without external antennas? My provider stuck me with one and nowhere to move it.
ReplyDeletewas wondering if u can use the windsurfer template for the xbox 360 dual router and still get the desired effect or do i have to fiddle about at the moment im useing a hexagon box type reflector only getting one bars but have been told that this wud work better for me i printed off a copy of the windsurfer and think that i cud make two holes at either side of the main hole to fit the router into
ReplyDeleteWindsurfer WiFi tests Very nice blog i have interesed your blog
ReplyDeleteRF Post processing