- Get original backing tracks (duh!)
Sometimes tracks are released alongside their instrumental versions (or karaoke/minus one) and these are the best bet to get a version that matches the original exactly. You can find these most often on CD singles and sometimes on bonus discs. Albums from Disney and Buena Vista sometimes have instrumental versions available (e.g. High School Musical OST Bonus disc and their Karaoke Sing-along CDG series). [+/-]
[+/-] - Get commercial backing tracks
These are tracks released by recording companies specialising in creating karaoke tracks. Many of them are quite good but they might not sound exactly the same as the original recording because they are mostly renditions recreated by an arranger. Good backing tracks will use real/matching instruments and follow tempos and keys whilst there are cheaper ones that rely on cheap MIDI banks and lower quality arrangements.
Example of sites include : PocketSongs and SoundChoice [+/-] - Music sharing websites/tools
Another option is to hit up music sharing websites looking for backing tracks. Sites such as Imeem.com usually have user uploads for backing tracks (some of them from official sources but illegally uploaded) which you can listen to and download. For this you would need additional software such as FreeMusicZilla to download the FLV files and then FLV extractor to extract the MP3 file from the downloaded FLV. Registration is required to listen to whole tracks on Imeem.Other options include the free website Sims on Stage (formerly SingShot) which offers free backing tracks to sing online. A simple trick allows you to download the tracks permanently to your harddrive for your own personal use which I will not discuss here. They offer quite a varied selection from 50s to current hits and other family favourites and their tracks seemed to be sourced from the SoundChoice library
UPDATE 2009 : Singshot link removed as EA has decided to close down the service. P2P networks are another great source for obtaining tracks - be it through Kazaa/eMule/eDonkey/VeryCD or through torrent sites. Just be wary of fake files, RIAA trackers and long download times due to unavailable seeds. [+/-]
 - Write your own in MIDI
Those well versed in music theory can try their hand at writing their own MIDI backing tracks although this would take time and quite a lot of skill (not forgetting to mention the hardware required). One option is to visit MIDI sites and try out user submissions there ... you might be surprised at what some users can come up with. Depending on your MIDI hardware, you can possibly render out a pretty useable backing track. [+/-] - Vocal removers
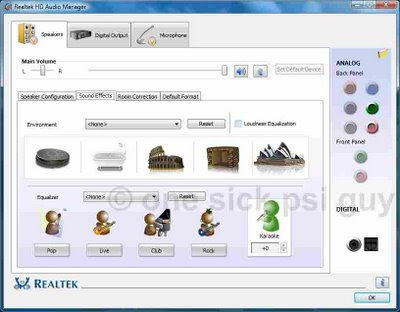
If you have a Realtek audio device in Windows, you probably have a corresponding audio manager control panel installed and within the settings there is one for vocal removal. This is a basic voice removing algorithm which basically takes the difference between individual channels from stereo audio file as the output (i.e. (L-R)÷2). At best, the vocals on a track can be removed - at worse, everything else is also removed. One problem with this simplified algorithm is that it affects the whole spectrum and removes everything in the phantom centre channel including vital parts. If your hardware does not have this setting, you can still obtain similar effects using the Vocal Remover effect with your audio files in Audacity.
My own trick instead is to use a plugin called "center cut" (yes, I know I switch between American and British spellings for centre) written by Moitah (who also wrote the FLV extractor referenced above) which itself is based on a plugin found in Virtualdub written by Avery Lee. The plugin runs in Winamp and no installation is required other than to copy the files into the plugin directory of Winamp. This plugin is available here.
To use, just activate the plugin in the Preferences—DSP/Effect page and set to "Center Cut - Sides (Bass to sides)" which is basically still using the same algorithm above, but this time it ignores the bass frequencies and allows them to pass unfiltered. The difference is quite obvious and really helps the output result sound better. Here are several examples comparing the original audio, conventional vocal remover and center cut plugin (note Google video muxes audio back to mono when hosting)
Using a combination of the center cut plugin and the diskwriter plugins in Winamp, you can generate your own backing tracks from any audio files you own and later recompress them or burn to CD. Note that results may vary depending on file and channel separation. [+/-] - DVD rips
This last method relies on how audio is encoded on a DVD and works best on animation and musical type movies (especially those from Disney!!). At a bare minimum, this method requires the audio to be properly encoded as discrete 5.1 Dolby Digital audio and will NOT work with 2.1 or PCM/MPEG stereo audio. This is because we need the vocals to be encoded in the centre channel and the audio only portions duplicated in the front or rear L/R channels. What remains is just to extract this digital stream, delete the centre channel and you're left with the backing track!
Extracting the audio from a DVD is pretty finicky, requires patience, quite a few tools (all 100% freeware of course), plenty of harddisk space and obvoiusly, the actual DVDs. First you need to extract the correct VOB file (or the whole movie but that wastes space) and remove any CSS protection if necessary. You can use tools like DVD Decrypter to get this done. Certain AVI files (from *ahem* sources) may also have a 5.1 Dolby Digital/AC3 stream and those can also be used.
The digital audio stream is then extracted. For AVIs, you can use VirtualDub to save the audio stream. Open the AVI file, select "Source audio" and "Direct stream copy" and save the WAV file with an ac3 extension.

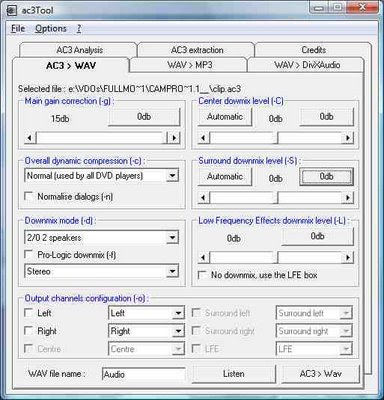
For VOBs you need an AC3 extractor - I usually use Ciler's AC3Tool with the AC3 extract function. Open the VOB file, select the audio track and location to save to and click Extraire to get the stream. What you end up with is a raw AC3 file for further processing to delete the centre channel.
To remove the centre channel, there are two possible options - AC3tool (mentioned above) or HeadAC3he (thats read as headache). Both have options to convert the AC3 stream to PCM wave format and allow you to select which channel to decode/downmix/ignore. I can't really say which tool is better 'cos some streams work in one program and not in the other and vice-versa with others ... go figure. This is where the trial-and-error phase comes in - some tracks will work better with just the front L/R channels whilst others get better results with rear channels only.
 The end result (if successful) is a raw PCM wave file ready for compression or burning to CD for use. Here's a sample clip ripped from two DVDs to show you what I mean - the first using front L/R channels from the Mandarin audio track (I ripped the wrong track but it worked anyways) and the second combining front and rear L/R channels for the final result. [+/-]
Legality issues aside, all methods discussed here are for your own use only and might not be approved/allowed by the copyright owners. All clips/videos shown here retain their original copyrights and are used - with apologies - to illustrate concepts only

No comments:
Post a Comment