Amazing Race ×2 ... again

Just concluded watching the first episode of Amazing Race S12 on AXN and this marks another round of double Amazing Race's for probably the next two months or so (The Amazing Race Asia S3 is coming to its fourth episode this week). I'm a fan of the series and have watched every single season of TAR and TARA and find each version has its own unique thing to offer.

This time round, TARA3 wins hands down in terms of content and can clearly call itself the "toughest race ever" based on first episode impressions. Heck! rumour has it that even the production staff fell ill during the filming of the race due to the stressful conditions.

The first episode of TAR12 was slow, boring, lenghty and didn't really work the competitors so far. The theme of the show felt like "grouping the teams" as each point in the race the teams were being segregated into groups that left for the next portion of the race at different time intervals. The sole challenge of TAR12 episode one is the choice in the detour - to climb down cargo net or crawl up the steps ... kinda lame IMO. It almost felt as if the producers ran out of ideas.
Compare that to the first episode of TARA3 - first challenge at the very start was to devour an entire bowl of bugs (containing fried scorpions, maggots, worms, frogs, grasshoppers etc) which I estimate amounted to maybe 800gms. Then its was to wash an entire two-storey passenger bus (a task which took most of the afternoon and night) followed by a pitch dark hunt for clues on temple grounds. An 18 hour bus ride later, it was the detour to race or rice - racing buggys or pounding rice resulting in muddy bodies or blistering hands. Definately much more exciting - even episode two was an extended length one since the leg lasted over 48 hours!!
Rants? TARA3 is the first season to be filmed entirely in FullHD 1080p but AFAIK, no carrier is actually broadcasting in HD, let alone FullHD - what a waste (but I could be wrong). TAR12 probably has more eye-candy in terms of competitors but TARA3 doesn't lose out by much there (but then Pailin and Natalie were eliminated last week). Competitors on TAR12 seem to be starting of pretty chummy except for one particular moment between Sarah with Nick and Starr. There hasn't been a breakdown in the first episode of TAR12 but Mai and Oliver have already showed their true colours during the end of the first episode of TARA3. Things might change as TAR12 catches up with more episodes, but for now TARA3 gets my vote for the better Amazing Race.

If only I can remember which teams go with which race (same prob last time with TAR12 and TARA2) ...

UPDATE 02102008 : Forgot about this ... whoever the subtitler is in ASTRO is doing a really bad job. Misunderstood words and sentences ("I'm so dumb" actually became something like "Aku sungguh gelap" or I'm so dark) and his/her crazy-ass spelling (why in heck would a simple word like Cyclo be subtitled as Xich Lo?). There is no need to translate and subtitle every single thing on screen, especially when the subs start to intrude into the actual screen action part. I cringe when I read the subs during the second viewing of episodes.
..... Show/hide full post

Looking for karaoke tracks?

No this isn't a post about me going to a karaoke bar (at least not this time round) but on how to get or create your own backing tracks for practise/ backup/etc. I've been asked this question quite a few times already, so I guess I'd do a write-up instead of repeating myself. Here are 6 ways on how I obtain my backing tracks - click on the [+/-] to read details.

  1. Get original backing tracks (duh!)
    Sometimes tracks are released alongside their instrumental versions (or karaoke/minus one) and these are the best bet to get a version that matches the original exactly. You can find these most often on CD singles and sometimes on bonus discs. Albums from Disney and Buena Vista sometimes have instrumental versions available (e.g. High School Musical OST Bonus disc and their Karaoke Sing-along CDG series).

    Disney's official karaoke series CD+Gs
  2. [+/-]
  3. Get commercial backing tracks
    These are tracks released by recording companies specialising in creating karaoke tracks. Many of them are quite good but they might not sound exactly the same as the original recording because they are mostly renditions recreated by an arranger. Good backing tracks will use real/matching instruments and follow tempos and keys whilst there are cheaper ones that rely on cheap MIDI banks and lower quality arrangements.

    Example of sites include : PocketSongs and SoundChoice
  4. [+/-]
  5. Music sharing websites/tools
    Another option is to hit up music sharing websites looking for backing tracks. Sites such as Imeem.com usually have user uploads for backing tracks (some of them from official sources but illegally uploaded) which you can listen to and download. For this you would need additional software such as FreeMusicZilla to download the FLV files and then FLV extractor to extract the MP3 file from the downloaded FLV. Registration is required to listen to whole tracks on Imeem.
    Imeem Other options include the free website Sims on Stage (formerly SingShot) which offers free backing tracks to sing online. A simple trick allows you to download the tracks permanently to your harddrive for your own personal use which I will not discuss here. They offer quite a varied selection from 50s to current hits and other family favourites and their tracks seemed to be sourced from the SoundChoice library

    UPDATE 2009 : Singshot link removed as EA has decided to close down the service.

    P2P networks are another great source for obtaining tracks - be it through Kazaa/eMule/eDonkey/VeryCD or through torrent sites. Just be wary of fake files, RIAA trackers and long download times due to unavailable seeds.
  6. [+/-]
  7. Write your own in MIDI
    Those well versed in music theory can try their hand at writing their own MIDI backing tracks although this would take time and quite a lot of skill (not forgetting to mention the hardware required). One option is to visit MIDI sites and try out user submissions there ... you might be surprised at what some users can come up with. Depending on your MIDI hardware, you can possibly render out a pretty useable backing track.
  8. [+/-]
  9. Vocal removers
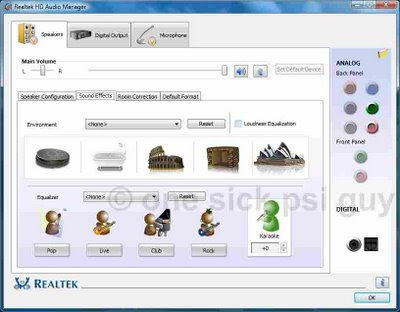
    If you have a Realtek audio device in Windows, you probably have a corresponding audio manager control panel installed and within the settings there is one for vocal removal. This is a basic voice removing algorithm which basically takes the difference between individual channels from stereo audio file as the output (i.e. (L-R)÷2). At best, the vocals on a track can be removed - at worse, everything else is also removed. One problem with this simplified algorithm is that it affects the whole spectrum and removes everything in the phantom centre channel including vital parts.

    Realtek control panelIf your hardware does not have this setting, you can still obtain similar effects using the Vocal Remover effect with your audio files in Audacity.

    My own trick instead is to use a plugin called "center cut" (yes, I know I switch between American and British spellings for centre) written by Moitah (who also wrote the FLV extractor referenced above) which itself is based on a plugin found in Virtualdub written by Avery Lee. The plugin runs in Winamp and no installation is required other than to copy the files into the plugin directory of Winamp. This plugin is available here.

    To use, just activate the plugin in the Preferences—DSP/Effect page and set to "Center Cut - Sides (Bass to sides)" which is basically still using the same algorithm above, but this time it ignores the bass frequencies and allows them to pass unfiltered. The difference is quite obvious and really helps the output result sound better. Here are several examples comparing the original audio, conventional vocal remover and center cut plugin (note Google video muxes audio back to mono when hosting)


    Using a combination of the center cut plugin and the diskwriter plugins in Winamp, you can generate your own backing tracks from any audio files you own and later recompress them or burn to CD. Note that results may vary depending on file and channel separation.
  10. [+/-]
  11. DVD rips
    This last method relies on how audio is encoded on a DVD and works best on animation and musical type movies (especially those from Disney!!). At a bare minimum, this method requires the audio to be properly encoded as discrete 5.1 Dolby Digital audio and will NOT work with 2.1 or PCM/MPEG stereo audio. This is because we need the vocals to be encoded in the centre channel and the audio only portions duplicated in the front or rear L/R channels. What remains is just to extract this digital stream, delete the centre channel and you're left with the backing track!

    Extracting the audio from a DVD is pretty finicky, requires patience, quite a few tools (all 100% freeware of course), plenty of harddisk space and obvoiusly, the actual DVDs. First you need to extract the correct VOB file (or the whole movie but that wastes space) and remove any CSS protection if necessary. You can use tools like DVD Decrypter to get this done. Certain AVI files (from *ahem* sources) may also have a 5.1 Dolby Digital/AC3 stream and those can also be used.

    The digital audio stream is then extracted. For AVIs, you can use VirtualDub to save the audio stream. Open the AVI file, select "Source audio" and "Direct stream copy" and save the WAV file with an ac3 extension.
    Set to direct stream to get original data
    Save files with ac3 extension
    For VOBs you need an AC3 extractor - I usually use Ciler's AC3Tool with the AC3 extract function. Open the VOB file, select the audio track and location to save to and click Extraire to get the stream. What you end up with is a raw AC3 file for further processing to delete the centre channel.

    AC3Tool's built-in extractor works well
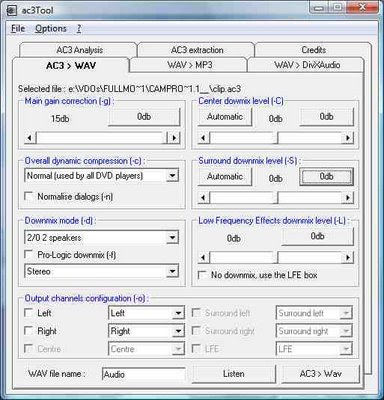
    To remove the centre channel, there are two possible options - AC3tool (mentioned above) or HeadAC3he (thats read as headache). Both have options to convert the AC3 stream to PCM wave format and allow you to select which channel to decode/downmix/ignore. I can't really say which tool is better 'cos some streams work in one program and not in the other and vice-versa with others ... go figure. This is where the trial-and-error phase comes in - some tracks will work better with just the front L/R channels whilst others get better results with rear channels only.

    AC3Tool channel extractor
    HeadAC3he channel extractorThe end result (if successful) is a raw PCM wave file ready for compression or burning to CD for use. Here's a sample clip ripped from two DVDs to show you what I mean - the first using front L/R channels from the Mandarin audio track (I ripped the wrong track but it worked anyways) and the second combining front and rear L/R channels for the final result.
  12. [+/-]

Legality issues aside, all methods discussed here are for your own use only and might not be approved/allowed by the copyright owners. All clips/videos shown here retain their original copyrights and are used - with apologies - to illustrate concepts only

Today Is Gonna Be a Great Day!

Can't get this song out of my head no matter how hard I try. Performed by Bowling for Soup, it constantly reminds me of their earlier single "Greatest day" which also had me humming the tune for weeks. This particular song has catchy chorus with great chord progressions, funny lyrics ... hey! where's Perry? :)


There's a hundred and four days of summer vacation,
'Til school comes along just to end it,
So the annual problem for our generation,
Is finding a good way to spend it
Like maybe...

Building a rocket, or fighting a mummy,
Or climbing up the Eiffel tower,
Discovering something that doesn't exist,
Or giving a monkey a shower,
Surfing tidal waves, creating nano-bots,
Or locating Frankenstein's brain,
Finding a Dodo bird, painting a continent,
Or driving our sister insane

This could possibly be the best day ever,
And the forecast says that tomorrow will likely be,
A million and six times better,
So make every minute count,
Jump up, jump in and seize the day,
And let's make sure that in every single possible way,
Today is Gonna to Be a Great Day!

Crossing a tundra or building a rollercoaster,
Skiing down a mountain of beans,
Devising a system for remembering everything,
Or synchronizing submarines,
Racing chariots, taming tiger sharks,
Constructing a portal to mars,
Building a time machine, stretching a rubber tree,
Or wailing away on guitars

This could possibly be the best day ever,
And the forecast says that tomorrow will likely be,
A million and six times better,
So make every minute count
Jump up, jump in and seize the day,
And let's make sure that in every single possible way,
Today is Gonna to Be a Great Day!

Let's put our heads together and design a master plan,
We may miss dinner, but I know mom will understand,
We got our mission and suppliers, yoghurt gumballs and desire,
And a pocket full or rubber bands, the manual on handstands,
Unicycle, compass, and a camera that won't focus,
And canteen full of soda, grab a beach towel here we go!
(this is Ferb-tastic)

This could possibly be the best day ever,
And the forecast says that tomorrow will likely be,
A million and six times better,
So make every minute count,
Jump up, jump in and seize the day,
And let's make sure that in every single possible way
Today is Gonna to Be a Great Day!

(Seriously this is gonna be great)

This could possibly be the best day ever
(Today's Gonna be a Great Day)
This could possibly be the best day ever
(Today's Gonna be a Great Day)

************

For those interested, I found this downloadable MP3 version (while the link exists) here. I did not upload this, so don't ask if why if the link no longer works.

UPDATE 27/09/2008 : Second download link found at mediafire. Same file as the first. Download link available here.

Both files are clean versions without dialogue.

..... Show/hide full post

Cringe-worthy Mamma Mia!

Attended the preview of Mamma Mia! yesterday nite courtesy of nuffnang at GSC 1Utama and as is the usual case of most bloggers, cameras and handphones were flashing everywhere to capture the moment for later blog posts (me excluded).

Mamma Mia!The movie was so-so in my opinion with a few genuine laughs at several points that kept my interest awake. ABBA music, no matter how catchy, kind of gets on the nerves after a while especially with the repeated chord transitions and patterns (ughs ... I'm analyzing the music too much). Two songs that really made me cringe was S.O.S. and The Winner Takes it All which felt too forced and too long for the moment.

Pierce Brosnan's singing was credible but bland (he should avoid musicals IMO) and he felt soooo out of place, wooden and uncomfortable when Meryl Streep was screaming out Winner. You could almost read Ms. Streep's mind as though she is thinking "Ughs, why won't that bloody wind stop blowing my shawl/wrap around" as she continuously fidgets with it on screen. A bad choice of filming location there.

Seems several songs were removed from the broadway version (as is the usual case with the limited running time) including Thank you for the music and Knowing me, Knowing you although the former is included in the soundtrack. Could possible mean it was filmed and cut during production. Additionally, Our Last Summer was moved from a duet between Harry and Donna to mostly a trio between Sophie, Harry and Sam with interjections from Donna and Bill. I could be wrong though as I'm basing this on the PVG score book.

Choreography was limited to big leaps and jumps along with dated moves from the flower power era although they did a funny thing with swimming flippers on the docks with the guys and with the girl power scene featuring Dancing Queen and aged old ladies dancing.

Overall? Watch it if you're a fan of ABBA music or musical genre, else give it a miss and wait for it on Astro or the nearest pasar malam dealer/torrent site. The movie has been ever-so-slightly censored to obtain the [U] rating in local cinemas.

..... Show/hide full post

New BIOS update for Acer M5640


NOTE 18/01/2009


This outdated post has been updated
here.

Took a MAJOR risk today and updated the bios on my Acer M5640 Aspire desktop with the latest revision number R01-B2. Why major you may ask? Well ... from what I can figure after searching around, the bios version IS official from Acer/AMI but it hasn't been released in many countries. As of yet, the bios firmware is only available on the Taiwan and Thailand Acer support websites whilst ALL other countries are still stuck at R01-A3 or worse at R01-A1.

Anyways, I downloaded the one from the Thai Acer website (both sites have different packages but the same firmware file) and proceeded with the firmware update using the Windows flash utility ... was too lazy to create a DOS bootdisk. It ran, it erased, it programed and then it 'hung' and Vista went into its familiar "Application is not responding" period. About 45 seconds later, the PC went into auto reboot and voilà the firmware update was complete (*phew*)

Whats new?

Major changes are additions to the "Advanced Bios Features" section of the bios which now has the option for "Installer OS select" with the options for Windows, Linux or other (supposedly to help in correctly booting OS installer discs) and an option to enable and disable speedstep on the CPU labeled "Speedstep Tech". Other menus seem to remain the same but I have nothing to compare to as I forgot to note down the changes prior to flashing (my bad).

Upon entering Vista however, it detected a new device and promptly installed drivers for PCI standard RAM controller and it now appears multiple times in the device manager. Have no idea what this device is and what it does but so far it doesn't seem to affect Vista in anyway.

New devices but what are they?
For those interested, here are the direct download links to the new bios revision for the M5640 (also for M1640 and M3640):
  • R01-B2 firmware from Thailand Acer Support website available for Windows/DOS and Linux
  • R01-B2 firmware from Taiwan Acer support website available for Windows/DOS. Instructions in Chinese.

NOTE 18/01/2009


This outdated post has been updated
here.


DISCLAIMER : Any attempts of this update is at your own risk and I do not take any responsibility. Attempts at changing hardware settings are not approved and may void your warranty if not done properly. All trademarks, tradenames and program names are property of their individual owners.

..... Show/hide full post

Vista vs. SB Live! Value (Round 1)

SB Live! ValueThis post is about my experiences with older hardware in Vista.

I had two Soundblaster Live! Value audio cards lying around collecting dust - one came from a disposed computer which I salvaged for parts (CT4830) whilst the other was salvaged from a friends' Dell Optiplex desktop before it was sold to a secondhand buyer (CT4780). These are the second and third/oem generation versions of the wildly popular Live! series but has since been dropped like an illegitimate child by Creative Labs (citing it as end-of-life) when Vista launched.

Just for fun, I installed one to see how Vista would handle this unsupported audio card.

Opening the case and inserting the card was tricky as the mobo on the Acer was a micro-ATX and space was scarce. With only two PCI slots free, I had to pick the lowest one to allow the graphic card seated in the PCI-e slot above some breathing space as it gets pretty hot. Its a tight squeeze but it manages to get in without much fuss other than the re-arrangement of several port extension cables.

On startup, Vista detected the card and promptly asked for the drivers which I then opted to search for online. 10 minutes later - surprise! surprise! - the card started its installation procedure with the drivers and basic apps (ctfmon.exe, cthelper.exe, ctxfispi.exe, etc.). It completed without any problems which completely threw me off guard since I was expecting it to fail. So, the SB Live! Value DOES install properly in Vista with supplied drivers as shown in screenshots below ...

SB Live! drivers found
Vista correctly identifies the card
Now, once installed, how does it actually sound? Terrible unfortunately ... but it DOES work. Applications can use the card for audio playback (confirmed using Winamp, WMP11, Videolan, PowerDVD and Vista Media Center). Vista sounds and alerts also do get playback once the default audio device has been set to the Live! card.

Apps detect the card as multichannel device
As reported, bass and treble management is totally hopeless in Vista. By default the bass is set so high that it over powers everything. Using the tone control panel helps a little bit, but if only the sliders went a little more then it would sound more balanced. I'm guessing there are also buffering problems with the drivers because during playback, the quality of the audio gets worse as it progresses ... sounding almost like its connected to an overdrive stompbox thats stuck.

Basic tone controls but range is too limited
MIDI still works and you get both SynthA and SynthB running a basic 2MB Soundfont bank (with no means of changing banks) but the softsynth is missing. Both available synths still sound better than the default GS wavetable on any Realtek AC'97/HD set. MIDI apps such as Cubase and Finale do see the MIDI I/O port but I didn't get a chance to test them to see if they actually work. One thing to note however is that the joystick port doesn't install and no drivers are available for it.

Next step, try other drivers. I forced the installation of the SB Live! 24-bit vista drivers and everything seemed to go well. They installed, complained a bit about compatibility and then requested a reboot. This is when all things when to heck. Vista wouldn't bootup and kept repeatedly going to restore mode. I then shutdown the PC, removed the card and will leave it as that for now until I have time to try out the kX drivers and how they actually sound.

So what did I prove today? Contrary to what has been written earlier, the Live! Value WILL work in Vista, just not the way you expect it to. If there is someway to access the tone settings other than through the control panel applet, there could be a possibility that this card may still have some life as a device in Vista PCs, but for now its back to the Realtek for me.

..... Show/hide full post

Windsurfer WiFi tests


Saw this posted a while back on DL.TV in which a paper template called Windsurfer (or Ez-12) was used to create your very own super cheap WiFi booster but I never got to trying it out until now (because I wasn't using any WLAN hardware back then ... duh!). Basically, when the pattern is cut and assembled it forms a parabolic 'dish' of sorts that focuses or boosts the signal towards a particular direction instead of letting the signal roam freely. The original site boasts an increase of 9dBi to 12 dBi and many people have also written in claiming that it managed to boost a signal to parts unreachable before.

Intrigued, I downloaded the template and did my own tests (and adaptations described later in this post).

My hardware consists of a D-Link DIR-615 wireless router running solely 802.11N mode with WPA2-PSK as the access point. The receiving end makes use of the D-Link Rangebooster DWA-140 USB wireless adapter also running in 802.11N. The signal has to travel through two solid brick walls before reaching its destination and often contends with two other APs located nearby. Here are the results using the installed software.

Signal strength at 7% when NO antennas attached.

Signal strength at 51% with single antenna attached.

Signal strength at 63% with dual antennas attached.

Signal strength at 85% with single antenna attached and Windsurfer.

Signal strength at 39% with single antenna attached and Windsurfer facing opposite direction
(to prove that the Windsurfer does actually affect the signal)

Based on my rather crude tests, I have to say that I'm impressed with how well the Windsurfer works. What's amazing is how a single antenna and the Windsurfer manages to beat a dual antenna setup.

Problems?

First off, the original JPG template was serviceable but rather crude and was a bit too large for the antennas of my router and the shelf space I had them in. Scaling the file resulted in the lines getting blurry. Secondly, the template itself was a little wonky for my liking 'cause the tabs didn't really match up with the slot positions. The resulting Windsurfer was ever-so-slightly skewed because of this. Additionally, the slots were too big for the tabs thus making tape or glue necessary to hold the parts together securely.

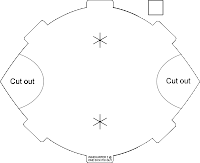
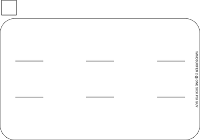
So I did a little tweaking and came up with my refined version of the original Windsurfer which I guess I dub Windsurfer 2. All instructions remain the same as the original Windsurfer and each template prints out for two (2) Windsurfers onto either Letter or A4 sizes. You can download the templates in PDF format below which will print out in colour or black-and-white. Coincidently, all test results shown above were made using these templates.


If the templates are the wrong size, you can download the following high-resolution .PNG files and scale them however large or small you like in any graphic program (or even Word or OpenOffice). Just make sure that the two squares next to the parts remain square and are the same size between them so that they can fit together later. My own rule of thumb, make the dish side height the same as your antennas to ensure that the entire signal is reflected back. You can even customize and add your own fills, logos, text, slogan, clipart onto the templates to suit your taste.
Dish support partDish part

  • The original Windsurfer template is still available with full instructions at the site here.
  • Original webcast on DL.TV is available for download here.
..... Show/hide full post